
Saturday 28 November 2009
Mac shadow Palette as of now (Pinks Purples Reds)

Friday 27 November 2009
Mac Eyeshadow Palettes As of Now (Blues and Greens)
I won't be going into quite as much detail in this post because I don't want to sound too repetitive.
You may notice I have titled this 'Mainly' Blues and Greens. This is because there are a couple of shadows with no proper home.
So without further Ado, Here is the Palette.
TOP ROW
Silver Thorn V P
Club Satin
Tilt Frost
Haunting Satin (I think)
MIDDLE ROW
Juxt Satin
Humid Frost
Strike a Pose StarFlash
BOTTOM ROW
Rated R StarFlash
One Off StarFlash
Deep Truth Frost
Thursday 19 November 2009
Mac Holiday Collection


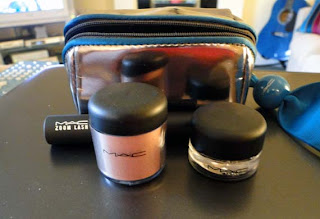

The Glitter is called Transparent Teal
Thanks for Reading Hope you like the post and keep a look out for some more in depth reviews of the individual items in the future
Wednesday 18 November 2009
Very short Very simple FOTD: Golden Browns
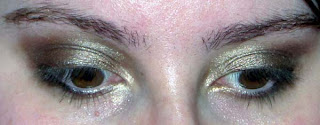
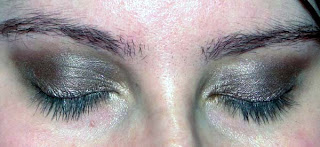
In this look I am sporting a very nice and yet very simple and more importantly very Quick Golden Brown look.
Tuesday 17 November 2009
Golden Greens
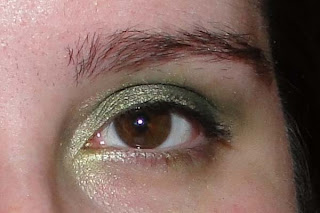

 GOLDEN GREENS
 · Mac Paint Pot in Barestudy
· NYX Jumbo Pencil in Black Bean
· Mac Eye Shadow in Juxt
· Mac Eye Shadow in Rated R
· Mac Eye Shadow in One Off
· Mac Eye Shadow in Humid
· Mac 239 Brush
· Mac 224 + 226 to blend
Firstly I applied my Mac Paint Pot in Barestudy all over my lid
Surprisingly I have to say my favourite and most used Jumbo Pencil Has to be Black Bean. It really makes the shadows standout. This is a look I am loving at the moment.
This was one of the 1st Mac eye shadows I bought.
It is a very nice light Green with a Satin finish. This means (if I’m understanding it correctly,) that it has the colour payoff of a Matte shadow with a small amount of shimmer.
Mac describes it as a ‘Bright Green with Gold shimmer.’ By using the black base first it really makes the Juxt appear a lot more vivid.
I applied this directly to the middle of the lid to work as a highlight and give depth to the look. I blended it out so it didn’t look too messy.
I was very hesitant when buying this shadow as. It is a very bright yellow green so I didn’t think it would suit me. However it seems to work really well with my brown eyes. It has been compared colourwise quite bit with Mac’s Bitter eye shadow although the finish is different.
Rated R has a Starflash finish.
I applied this to the outer corner and blended into the crease. I have read some reviews on this colour and people say it is comparable to Humid and Swimming. I would say that it’s definitely lighter than humid. Unfortunately I can’t tell you if it compares to swimming as I unfortunately don’t own it.
I applied this to my crease to give the look a bit of depth. I feel this worked well with all the other greens I used in the look.
Mac Eyeshadow Palettes As of Now (Neutrals) + Favourite eyeshadow
If you want me to go into more detail about the shadows in general or even a specific colour then let me know.
I depotted them as I thought it would be a good way to save storage space. I was reluctant to do this originally as I thought it was a lot of hassle and didn't really see the point.
However since I joined the depotting bandwagon I have discovered how much easier it is to do makeup. Instead of having to look for a number individual puts, all I have to do now is decide what colour theme I want, grab the relevent Palette and in there should be all the shadows you need. (Of course this is assuming the look would be using all mac shadows.)
At the moment my Palettes aren't full. I will do an updated version of this series when needed.
For those of you that aren't familiar with Mac Eyeshadows there are several different finishes. This means that they have different textures. This may give a different to the look to the shadow, the pigmentation and in some cases even the way the shadow applies to the lid. I have added the finishes for each of the shadows in brackets next to the shadow names.
I will do another post showing 1 of each of the different shadow finishes and tell you a bit about them then, otherwise this post will be very long.
Now on to the 1st Palette I have chosen.

Neutral
As you can see I have 8 Neutral Mac shadows, Plust 2 or 3 that came in a quad that I haven't yet depotted. (You will see these in a later post.)
Top Row L-R
Glamour Check (Starflash was LE) Satin Taupe (Frost)
Middle Row L-R
Tempting (Lustre) Woodwinked (Veluxe Pearl) Smoke and Diamonds (Starflash was LE)
Bottom Row L-R
All That Glitters (Veluxe Pearl) Sable (Frost) Swiss Chocolate (Matte)
My Favourite eyeshadow in the set has to be Woodwinked. I love the finish and the colour is very pretty. I watched a lot of youtube videos before getting this eyeshadow. I was curious because everyone was saying on camera it didnt look very pretty and in real life it was so much nicer and every1 needed to get it.
I decided to go and have a look even though I wasnt expecting to see anything that I hadnt seen from the videos. Much to my surprise everyone was right. The pictures and videos didn't do it justice at all! This is a beautiful colour and a MUST HAVE in everyones collection.
If you see a picture of this and decide its not for you at least go and have a look at it in store before you decide. On the other hand if you already own this shadow I would love to hear what you think.
Going by my collection of Neutrals are there any that you own that you think I should have? Preferably nothing to similar to ones I already have.
Thanks in advance and I hope you enjoyed :)
Monday 16 November 2009
Swap with Sirvinya :)
In the shop it looked like a lovely deep purple colour, on the way home I realised it had a green iridescence, this made it very interesting as I thought it would be a very unique colour. I couldn’t wait to try it when I got home.
Much to my disappointment when I finally did get home I looked at it again, the lovely deep purple with green I had seen in the shop had GONE!! It was now a dark BLACK nail polish with Purple and Green iridescence. I couldn’t understand how it looked so pretty in the shop. I genuinely thought I had picked up the wrong colour. Nonetheless I thought I would try it in the hope that I was going to be pleasantly surprised. I put it on a couple of my nails...and as I expected it looked HORRIBLE on me.
Soon after I bought this nail polish I was chatting to my friend Becky (Aka Sirvinya) on blogtv. I told her about this little mistake and she said that she had wanted it for ages and it was always sold out. As I knew I was NEVER going to wear it I offered to send it to her along with a few extra bits.
There is an Excellent blogpost at sirvinya.com so go and check it out if you want to hear her thoughts and see the other things I sent her. Just look for the post titled 'Swap with Jo.' :) Sorry there is no link. For some reason Blogger won't let it work. So you will have to just copy and paste and search for the post. Sorry :(.
In return Becky offered to get me something when she went to London. ... A SLEEK PALETTE!!!!
I have wanted this particular item ever since I started watching YouTube I have not been able to get my hands on one of these even though these are sold in a lot of Superdrug stores.
I was very excited when the parcel arrived. It had a very cute sticker on the back with her name and address. She also had a business card inside with a little note on the back saying she hoped I liked the goodies.
 I have played with the pallete a few times. I have come up with quite a few lovely looks with it so needless to say I absolutely LOVE IT. I won’t say too much about it here though because I am planning on doing a proper review on it soon.
I also mentioned to Becky that I had quite a lot of empty MAC eye shadow pots.
Now, you may or may not know that you can depot your mac eyeshadows into a palette and return the empty pots for them to recycle. If you do this and take back 6 ‘Empties’ you can exchange them for a free lipstick.
As I have never done this before because I don’t live near a Mac store or counter I had quite a few pots piling up in my makeup collection. Becky was kind enough to exchange these for me.
It turned out I had 27 pots, this was enough for 4 lipsticks. There were 3 extra pots which she sent back to me to go towards anymore that I may get in the future.
 I gave Becky a list of about 10 Lipsticks that I liked just in case they didn’t have one. Apparently Becky gave the list to the Makeup Artist at MAC and told them to pick. The ones I received were Creme D’nude, Up The Amp, Hue, and Dubonnet. I am very pleased as I was secretly hoping I would get 3 out of 4 of these colours. I will also do separate posts on these. Whether I decide to do just these or combine it with my other lipsticks I don’t know yet. Let me know if you have any preference. Here are the colours I recieved.


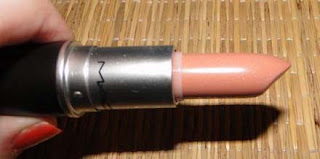 I am not sure if this was planned but 2 of the lipsticks are very bold and the other 2 are very nude. This worked out very well.


The other Dazzle Dust I got was Number 93 Block Blue. This appears to be a Matte Blue. It is also nice applied wet as it really shows the vibrancy of the colour. Both Dazzle Dusts are very pretty.

As with the lipsticks I will do a post on these but I will be combining them with the rest of my Dazzle Dust collection. I have 8 now.
I would just like to end this post by saying a very big Thankyou to you Becky. This was my 1st experience with swapping. It was very enjoyable and there is not one thing that I received that I don’t like.
I hope we can do it again sometime Becky...maybe...if you want ...hehe.
Thanks again.
Monday 9 November 2009
Nailene Review Part 3
The 1st of the 2 packs is called ‘So Natural.’

This kit includes 36 Nails in 18 different sizes and Nail Glue. (Each nail has a small number on the tip to establish the size.)
Nailene Says
‘Perfect Fit every time. These So Natural nails are made with exclusive technology and designed to flex-to-fit either flat nails or high arched nails. ’To Remove: Soak in Acetone polish remover until artificial nails dissolve. DO NOT break or peel off nails.
The Nails themselves are made out of Plastic. The Ingredients for the glue include: Ethyl 2-cyanoacrylate, Polymethyl Methacrylate
DANGER: Cyanoacrylate bonds the skin and eyes in seconds. It is irritating to the eyes Respiratory system and skin. Keep out of Reach of Children. Avoid Contact with Clothing as it can burn. Do NOT use if nail is inflamed of infected. If accidental eye / skin contact occurs flush with water for 15 minutes. Seek medical attention for eye or internal contact.
I love the fact that they aren’t too long and won’t require a lot of filing to get to a length that suits me. The other thing I was surprised about, I found some that actually fitted my TINY nails without filing.
I will take some photos and let you know how I get on with these once I have applied some.
Nailene Also have available a pack of the same ‘So Natural’ nails but this time with a non chip technology.
The second pack I was sent is called Couture and it has a design on the tip.

Nailene says
Nail designs straight off the runways! Wear today’s hottest nail trends with a fast and easy application. Perfect fit and Long wear.
(All the other information on the packaging is the same as the previous pack mentioned)
Saturday 7 November 2009
Nailene Review Part 2 of 3
I will be sure to add pictures of all the packaging to give you an idea of what it was like....except the box as my mum threw it away before I had the chance to do so (oops) lol.
Inside the box was a purple gift bag which was stuffed with purple and green tissue paper. Purple is my favourite colour so this made it even better!

I was very impressed with the effort the Nailene team went to in making the package look as pretty as it did
Disclaimer: Yes I admit I did receive these products for free. However this WILL NOT have any effect on the review. I was NOT paid to do this. Therefore I will be sure to give you my HONEST opinions. Aside from the info on the product packaging the rest are just MY experiences and Opinions. If you don’t agree then that’s completely fine. :)
PERFECT TIPS + TOES FRENCH POLISH GUIDES

Nailene brings the salon home to you! Achieve a salon perfect French Manicure with these Polish Tip Guides.
I used these today with the Pearly Pink French Manicure Pen.
To be honest I find doing French nails very fiddly so even with the tip guides I feel I need quite a bit more practice. I am sure this is nothing to do with the product, I think it’s just because my hands aren’t that steady.
In my Opinion the guides and pen come as a whole. I feel people would find it a lot easier to use both together rather than separately. I used both today.
The one mistake I made was by deciding to save on guides, I used one for each hand. Looking back on it I feel this was a mistake. In my opinion it would work a whole lot better to use 1 tip guide per nail (I will try this next time.)
FRENCH MANICURE PEN: PEARL PINK


Nailene Says: For Fingers and toes in two easy steps.
Optional: Apply tip guides across curve of nails to separate tip area.
Step 1: Actively shake pen. Press tip onto a protected surface for 30 seconds until tip is saturated with polish. Apply two coats to the tips of nails, let them dry. If guides were used peel them off gently.
Step 2: Apply one or two coats of Nailene’s Hard and healthy basecoat to the entire nail.
Be careful when do you the 1st step. As you run the risk of applying to much product, (this has happend to me many times.) Also be sure to make sure the tips are COMPLETELY dry before removing the guides, otherwise you will end up having to redo, (this also happend to me many times.)
I noticed step two says to use Nailene's Hard and Healthy base coat. For those of you that may now be thinking you have to rush out and buy this product in my opinion it isn't a necessity. I don’t actually own this. I used the base coat I own which worked fine for me. So i'm sure any base coat would work perfectly well. I also applied a Dry Fast Top Coat on top to make drying a bit quicker. I will do a review at a later date of those two products.
I managed to get one nail to look half decent the other day. Two days later it is still looking as good as when it was first applied, Which I am actually quite pleased with considering it was 1st proper attempt. (two or three days after this the nail has come off completely so I will reapply soon to take a photo.)
I do have the white Pen as well but I haven’t really used it that much. I am not going to review this as it would be exactly the same.
I believe there is also a Pearly White available which i don't own and possibly even a black...I am not too sure on the black so dont quote me on that
BEDAZZLE SUPERSTAR NAIL ART FOR FINGERS AND TOES

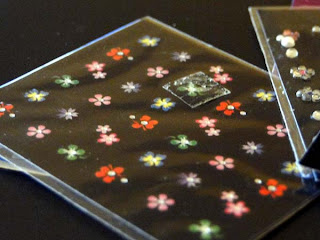
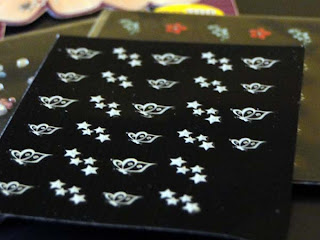
Easy to apply nail art stickers for fingers and toes! Everything you need to create fabulous nail art, all at the tip of your nails.
Application: Gently peel sticker off of the sheet and press onto the nail. For longer lasting effects apply a clear nail polish €over the entire nail.
To Remove: Use a nail polish remover, CAUTION KEEP OUT OF REACH OF CHILDREN
Ingredients include Acrylic Polymer, Acrylic Resin, BHT, Glass Fibres.
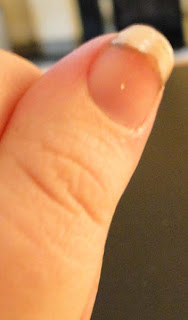
As with the French tip pen I found these very fiddly. I applied one to my thumb today and I really like the effect.
I always used to think this type of nail art was quite tacky. To be fair I was only used to the kiddie type stickers that came off after an hour.
These Nailene one are very good. They are really pretty dainty stickers. I have been doing this review over the last few of days. Two days after applying the sticker was still on with no sign of any lifting 2 or 3 days later they have now completely come off, however I am still very impressed.
Pictures will be added when I have had a chance to take them and Part 3 to come when I have tried the false nails.
Hope you are enjoying the Nailene Review so far.
All comments welcome.
Friday 6 November 2009
Nailene Review Part 1 of 3
I sent them my blog after they posted a message on twitter asking if any beauty bloggers would be interested in reviewing some products.
I was very pleased and amazed that I had been accepted my offer to do this for them as I am new to the blogging world and I don’t have many followers yet.
First off I would like to thank Nailene for giving me this opportunity. I am very grateful. I have spoken to a couple of other companies about reviewing products for them but was always turned away because I didn’t have enough followers (which is fair enough.)
I will be doing this review in 3 separate posts. This one will be about my experience with the company. The next 2 will be the products I received.
I am very impressed with Nailene as a company. The customer service I have received from them has been very good. I honestly cannot fault it. I have emailed them a few times since they contacted me about doing this review and each time they were very quick to reply and very helpful with the information they gave me. So on that basis and the products I have tried so far I will be sure to purchase some of their other products in the future.
Thank you again Nailene for this opportunity. I hope I get the chance to work with you again someday.
Keep your eyes Open for Part 2 to follow shortly.
Thursday 5 November 2009
Double NOTD's
This time I decided to do my nails a couple of different times with different colours take photos of each then do 2 NOTD's in one post.
So without further ado here are the pictures

The First picture is showing Aspen by Nails Inc.
The reason it is at a strange angle is because most of the other nails were a bit of a mess as I left it too late to photograph. The thumb was the only nail that looked half decent so i tried to take the photo while hiding the fingers.
I hope you will be able to see the true colour of this. It is a very pretty red kind of metallic shimmer. It would be a perfect colour for christmas or a night out. Although I personally do like it for during the day aswell. I think this is one of my favourites in my collection.
The second picture is showing Hans Place also by nails inc.
Now there is a funny story about this one. I have had it for what must be about a year (maybe longer.) I was regretting buying it for ages because I decided I didn't like it. Then I bought a set quite a while after, I got it home to find in the set was this colour again...at this point I have Two of the same colour (Oh No!!) It worked out okay though because I gave one to my friend Becky as I thought there is no way i need two.
Anyway it came to Halloween, and I decided it was a perfect time to try it out again. I am so glad I did because I really loved it!!...Okay admittedly it wouldn't be something i wear on a regular basis but for Halloween it was perfect.
I went through a stage a while ago where the only nail polishes I bought were Nails Inc, so as you can imagine I have quite a few now. If you want I will do a Nails Inc collection post on day? Let me know.
Youtube however has introduced me to a few other brands so I now have a growing collection of OPI, Chinaglaze and Gosh.
Maybe I will do a separate collection post of the rest of my collection aswell? Again let me know in the comments.
Okay as always this post is longer than I was intending it to be so I hope I haven't bored anyone lol... It's amazing how addictive it is once you get going.
On that note I think that's All I have for now.
More nail posts to come.
bye for now :)
Tuesday 3 November 2009
Lavender Blue Makeup LOTD + Tutorial


Here is a list of the things I used
Mac Paint Pot in Barestudy
Mac 239 Brush
Mac 226 Brush
Mac Haunting Eye Shadow
Mac Fix+
Mac Violet Pigment
Dior show Mascara sample
Well what can I say I was experimenting with my makeup this morning and this is the look I came up with.
It is quite vibrant but I really like it. In my opinion it’s fine for during the day but it would be great for a more dramatic evening look by just adding some eyeliner.
First I took my Mac Paint Pot in Barestudy and applied it all over my lids with my finger.
Then using my Mac 239 brush, I applied a turquoise blue Eye Shadow over the paintpot. I used Haunting by Mac, but any vibrant turquoise blue would work.
After doing this I decided I wanted the turquoise to look more vibrant. So I wetted my brush and reapplied Haunting in exactly the same way as before.
Once I was happy with the vibrancy of the turquoise, using the same brush I applied Mac’s Violet pigment to my crease. I did this a couple of times to get the vibrancy that I wanted. I then blended out the crease using my Mac 226 brush.
I finally added some mascara to my lashes. I used my Diorshow sample which I love. You can use any mascara you like.
I hope you like this look. I know I love it. If you try it out let me know I would love to hear how you get on.
:)
Oh just a quick mention I recieved some lovely things the other day from Nailene. So look out in the near future for a review of the things they sent me.
I am telling you about it here so that (if i take ages getting the post done) you guys can nag me lol
Sunday 1 November 2009
Current Favourites Summerised
I won't be doing the normal 'Monthly Favourites' because I dont want to feel like I HAVE to do it religiously. So I will just be doing it as and when I feel the need.
As I have a LOT of favourites I thought I would do the list in this post to tell you all what they are. Then I will do a series of 'Jo's Must haves.'
I decided to do it this way for two reasons. A I thought it would better for you to have a number of shorter posts to read rather than one giantsize one. (I know this one is getting quite long now but you guys know what I mean.) B. It'll make me do MORE BLOGGING!!
Let me know if you like this idea or whether you would rather one GIANT blogpost?
Anyway, now all that has been said Here is my list of 'Jo's Must have's
Mac Brushes 109 217 239 224
Mac Tender Tone
Mac Naked Honey Skin Salve
Mac Paint Pots
Mac Eyeshadow Palettes
Mac Woodwinked Eyeshadow
Mac Lollipop Lovin Lipstick
Mac Naked Paris Lipstick
Mac Wipe
Mac Fix+
Neutrogena Hand and Nail Cream
Neutrogena Daily Scrub
Lush Honey I Washed The Kids Soap
Lush Butter Ball Bath Bomb
Lush Comforter Bubble Bar
Lush Lemony Flutter
Seche Vite Dry Fast Top Coat
Seche Ridge Filling Base Coat
OPI Original Nail Envy
Body Shop Aloe Restoring Mask
Diorshow Mascara Sample
Maybelline Colossal Mascara
Rimmel Sexy Curves Mascara
BeautyUK Palettes
NYX Jumbo Pencils (Especially Black Bean)
Clarins One Step Cleanser
Batiste Dry Shampoo
Tangle Teaser
One more thing I would like to add. I know there are no pictures of the products mentioned. Don't worry there is a reason for this.
I knew there was going be a lot of favourites on my list. So I thought by adding pictures it might be a bit overwhelming for people. So I will add the pictures to the various posts throughout the series....Also it will encourage you all to read future posts in this series. Hehe...Told you there was a method in my madness. :) ;)
Hope you enjoyed.


